LAMP කියන්නේ open-source software කිහිපයක එකතුවක්. ඒ කියන්නේ Linux, Apache HTTP Server, MySQL database, and PHP).
මේ tutorial එකේදි මම ඔයාලට කියලා දෙන්නේ කොහොමද RHEL/CentOS 7 වල LAMP install කරන්නේ කියලා.
මේකට ඔයාල VPS එකක් හරි dedicated server එකක්හරි ගන්න ඕන. මම Datacenter.lk/ එකෙන් VPS එකක් ගන්නවා . ඔයාලටත් එතනින්මහරි වෙන කැමති service provider කෙනෙක්ගෙන් හරි ගන්න පුළුවන්
මේකෙදි මගේ server එකේ hostname එක test.sysadmin.lk.
මුලින්ම කරන්න පොඩි දෙයක් තියෙනවා.EPEL Repository එක අපේ server එකට configure කරගන්න ඕන. Repository ගැන මම ඉස්සරහට කියලා දෙනවා.
[root@test ~]# yum -y install epel-release
[root@test ~]# rpm -Uvh http://rpms.remirepo.net/enterprise/remi-release-7.rpm
Retrieving http://rpms.remirepo.net/enterprise/remi-release-7.rpm
warning: /var/tmp/rpm-tmp.HOZvuv: Header V4 DSA/SHA1 Signature, key ID 00f97f56: NOKEY
Preparing...                          ################################# [100%]
Updating / installing...
   1:remi-release-7.8-1.el7.remi      ################################# [100%]

[root@test ~]# yum -y install yum-utils vim lrzsz wget mlocate
ඉතින් LAMP අපි පිළිවෙලට setup කරගෙන යමු. linux, ඒ කියන්නේ REDHAT හරි CENTOS හරි අපි දැනටම install කරලනේ තියෙන්නේ.ඒ නිසා අපි ඊළගට APACHE, ඒ කියන්නේ web werver එක setup කරමු.
[root@test ~]# yum update
[root@test ~]# yum -y install httpd mod_ssl
[root@test ~]# systemctl start httpd.service
[root@test ~]# systemctl enable httpd.service
දැන්නම් apache web service eka setup වෙලා තියෙන්නේ.ඒ උනාට එළියේ ඉදන්, ඒ කියන්නේ local host එකෙන් පිට ඉදන් මේ server එකේ වෙබ් service එක access කරන්න බැ. මොකද අපේ server එකේ firewall එකෙන් වෙබ් access කරන ports block කරන නිසා. සාමාන්යෙන් වෙබ් services වලට අපි ports දෙකක් පාවිච්චි කරනවා. port 80 HTTP වලටත් port 443 HTTPS වලටත්.
ඉතින් අපි මේ port දෙකට අපේ firewalld / IP tables වලින් access හදන්න ඕන. firewall ගැන මම ඔයාලට ඉස්සරහට කියලා දෙන්නම්. දැනට මේ firewall rule දෙක දාල වැඩේ ගොඩ දාගමුකො.
[root@test ~]# firewall-cmd --zone=public --permanent --add-service=http
[root@test ~]# firewall-cmd --zone=public --permanent --add-service=https
[root@test ~]# firewall-cmd --reload
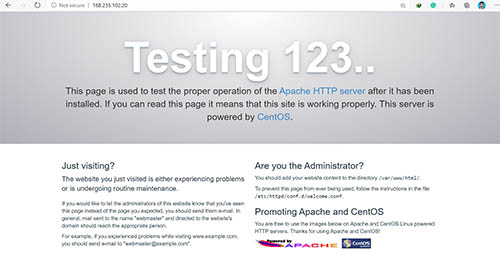
ඊට පස්සේ තියෙන්නේ පොඩ්ඩක් test කරලා බලන්න. දැන් ඔයාගේ windows machine එකෙන් හරි වෙන machine එකක ඉදන් හරි අපි setup කරපු server එකේ IP එක web browser එකේ ගැහුවම පල්ලෙහා පේන විදියට apache test page එක පෙන්න ඕන.
ඊළගට setup කරන්න තියෙනේ mysql.ඒ කියන්නේ database service එක දාන එක.පල්ලෙහා command දෙක run කරන්න විතරයි තියෙන්නේ.
[root@test ~]# yum install mariadb-server
[root@test ~]# systemctl start mariadb
තව දෙයක් තියෙනවා කරන්න.දැන් මෙහෙම yum install ගහල setup කරාට server එක shutdown කරලා up කලොත් හරි reboot කලොත් හරි මේ services auto start වෙන්නේ නැ.එකට කරන්න තියෙන්නේ systemctl enable mariadb කියන command එකෙන් අපේ mysql service එක auto start වෙන්න සෙට් කරන්න ඕන පල්ලෙහා තියෙන command එකෙන්.
[root@test ~]# systemctl enable mariadb
Created symlink from /etc/systemd/system/multi-user.target.wants/mariadb.service to /usr/lib/systemd/system/mariadb.service.
හරි, දැන් තියෙනවා අපේ mysql server එකේ පොඩි changes ටිකක් කරන්න.සාමාන්යෙන් mysql server එක setup උනාම එකට root password එකක් නැතුව setup වෙන්නේ.ඉතින් අපි mysql root password එක සෙට් කර කරගන්න ඕන. පහල command එක type කලාම ඒ ටික කරගන්න පුලුවන්.
[root@test]# mysql_secure_installation

NOTE: RUNNING ALL PARTS OF THIS SCRIPT IS RECOMMENDED FOR ALL MariaDB
      SERVERS IN PRODUCTION USE!  PLEASE READ EACH STEP CAREFULLY!

In order to log into MariaDB to secure it, we'll need the current
password for the root user.  If you've just installed MariaDB, and
you haven't set the root password yet, the password will be blank,
so you should just press enter here.

Enter current password for root (enter for none):
OK, successfully used password, moving on...

Setting the root password ensures that nobody can log into the MariaDB
root user without the proper authorisation.

Set root password? [Y/n] y
New password:
Re-enter new password:
Password updated successfully!
Reloading privilege tables..
 ... Success!


By default, a MariaDB installation has an anonymous user, allowing anyone
to log into MariaDB without having to have a user account created for
them.  This is intended only for testing, and to make the installation
go a bit smoother.  You should remove them before moving into a
production environment.

Remove anonymous users? [Y/n] y
 ... Success!

Normally, root should only be allowed to connect from 'localhost'.  This
ensures that someone cannot guess at the root password from the network.

Disallow root login remotely? [Y/n] y
 ... Success!

By default, MariaDB comes with a database named 'test' that anyone can
access.  This is also intended only for testing, and should be removed
before moving into a production environment.

Remove test database and access to it? [Y/n] y
 - Dropping test database...
 ... Success!
 - Removing privileges on test database...
 ... Success!

Reloading the privilege tables will ensure that all changes made so far
will take effect immediately.

Reload privilege tables now? [Y/n] y
 ... Success!

Cleaning up...

All done!  If you've completed all of the above steps, your MariaDB
installation should now be secure.

Thanks for using MariaDB!

[root@test]# mysql -uroot -p
Enter password:
Welcome to the MariaDB monitor.  Commands end with ; or \g.
Your MariaDB connection id is 11
Server version: 5.5.65-MariaDB MariaDB Server

Copyright (c) 2000, 2018, Oracle, MariaDB Corporation Ab and others.

Type 'help;' or '\h' for help. Type '\c' to clear the current input statement.

MariaDB [(none)]> show databases;
+--------------------+
| Database           |
+--------------------+
| information_schema |
| mysql              |
| performance_schema |
+--------------------+
3 rows in set (0.00 sec)

MariaDB [(none)]>
හරි.ඊළගට අපිට තියෙන්නේ PHP install කරලන්න. yum install වලින් setup කරලා apache restart කරන්න තියෙන්නේ.
[root@test]# yum-config-manager --enable remi-php73
[root@test]# yum install  php php-bcmath php-cli php-common php-devel php-gd php-imap php-intl php-json php-ldap php-mbstring php-mysqlnd php-odbc php-opcache php-pdo php-pecl-mcrypt php-pecl-zip php-process php-soap php-xml php-xmlrpc php-mysql
[root@test ~]# systemctl restart httpd.service
[root@test ~]# php -v
PHP 7.3.24 (cli) (built: Oct 27 2020 11:01:59) ( NTS )
Copyright (c) 1997-2018 The PHP Group
Zend Engine v3.3.24, Copyright (c) 1998-2018 Zend Technologies
    with Zend OPcache v7.3.24, Copyright (c) 1999-2018, by Zend Technologies
ඊළගට තියෙන්නේ ඔයාගේ domain එක vps එකේ IP එකට point කරන්න. වැඩේ උනාට පස්සේ ඔයාගේ domain name එක browser එකේ type කලට පස්සේ apache default page එක පෙනෙන්න ඕන.
ඊලග post එකේ මම ඔයාලට කියල දෙන්නම් apache virtual හොස්ට් එකක් create කරලා free SSL certificate එකක් දාගන්න විදිය.
මේ වගේ ගොඩක් දේවල් ඉගෙනගන්න අපේ youtube channel එක subscribe කරලා තියාගන්න අමතක කරන්න එපා 🙂
youtube channel: https://www.youtube.com/channel/UCa4SYOgJK_lZBiNnGY3TF4Q
![]()