Configure jenlkins repo.
sudo wget -O /etc/yum.repos.d/jenkins.repo \
    https://pkg.jenkins.io/redhat-stable/jenkins.repo
sudo rpm --import https://pkg.jenkins.io/redhat-stable/jenkins.io-2023.key
sudo yum upgrade
# Add required dependencies for the jenkins package
sudo yum install fontconfig java-17-openjdk
sudo yum install jenkins
sudo systemctl daemon-reload
Weekly release
A new release is produced weekly to deliver bug fixes and features to users and plugin developers. It can be installed from the redhat yum repository.
sudo wget -O /etc/yum.repos.d/jenkins.repo \
    https://pkg.jenkins.io/redhat/jenkins.repo
sudo rpm --import https://pkg.jenkins.io/redhat/jenkins.io-2023.key
sudo yum upgrade
# Add required dependencies for the jenkins package
sudo yum install fontconfig java-17-openjdk
sudo yum install jenkins
Start Jenkins
You can enable the Jenkins service to start at boot with the command:
sudo systemctl enable jenkinsYou can start the Jenkins service with the command:
sudo systemctl start jenkinsYou can check the status of the Jenkins service using the command:
sudo systemctl status jenkinsIf everything has been set up correctly, you should see an output like this:
Loaded: loaded (/lib/systemd/system/jenkins.service; enabled; vendor preset: enabled)
Active: active (running) since Tue 2023-06-22 16:19:01 +03; 4min 57s ago
...|
If you have a firewall installed, you must add Jenkins as an exception. You must change |
Post-installation setup wizard
After downloading, installing and running Jenkins using one of the procedures above (except for installation with Jenkins Operator), the post-installation setup wizard begins.
This setup wizard takes you through a few quick “one-off” steps to unlock Jenkins, customize it with plugins and create the first administrator user through which you can continue accessing Jenkins.
Unlocking Jenkins
When you first access a new Jenkins instance, you are asked to unlock it using an automatically-generated password.
- Browse to
http://localhost:8080(or whichever port you configured for Jenkins when installing it) and wait until the Unlock Jenkins page appears. you can change the default port by editing ” /usr/lib/systemd/system/jenkins.service”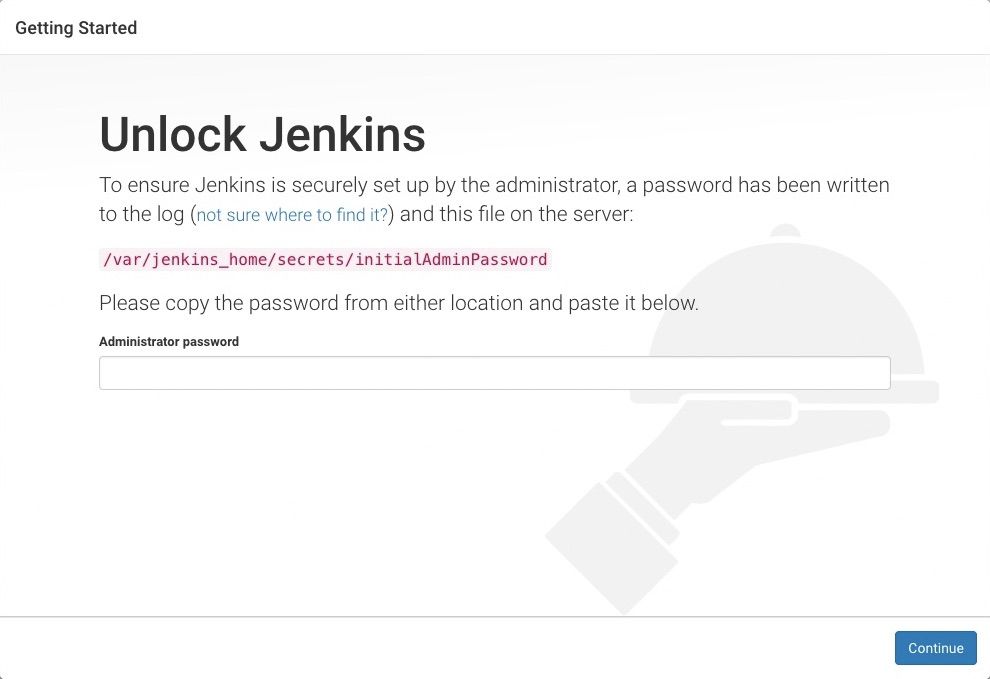
- From the Jenkins console log output, copy the automatically-generated alphanumeric password (between the 2 sets of asterisks).
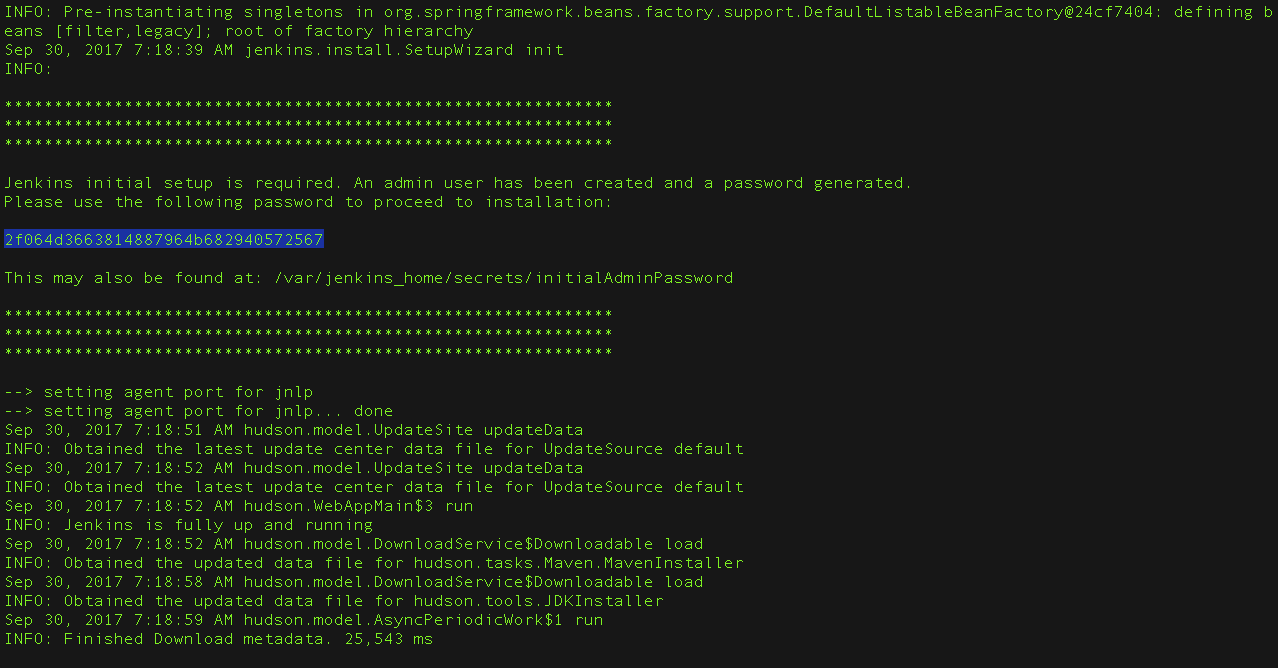
Note:- The command:
sudo cat /var/lib/jenkins/secrets/initialAdminPasswordwill print the password at console. - If you are running Jenkins in Docker using the official
jenkins/jenkinsimage you can usesudo docker exec ${CONTAINER_ID or CONTAINER_NAME} cat /var/jenkins_home/secrets/initialAdminPasswordto print the password in the console without having to exec into the container.
- The command:
- On the Unlock Jenkins page, paste this password into the Administrator password field and click Continue.
Note:- The Jenkins console log indicates the location (in the Jenkins home directory) where this password can also be obtained. This password must be entered in the setup wizard on new Jenkins installations before you can access Jenkins’s main UI. This password also serves as the default administrator account’s password (with username “admin”) if you happen to skip the subsequent user-creation step in the setup wizard.
![]()